> ## Documentation Index
> Fetch the complete documentation index at: https://docs.chift.eu/llms.txt
> Use this file to discover all available pages before exploring further.

# Netsuite

export const OverviewLegend = ({showTitle = true}) => <blockquote>
    {showTitle && <p>
        <strong>Overview legend 🧭</strong>
      </p>}
    <table>
      <thead>
        <tr>
          <th>Column</th>
          <th>Value</th>
          <th>Meaning</th>
        </tr>
      </thead>
      <tbody>
        <tr>
          <td>Geography</td>
          <td>🇫🇷 FR · 🇧🇪 BE · …</td>
          <td>Countries where the connector is officially supported.</td>
        </tr>
        <tr>
          <td rowSpan={3}>Software type</td>
          <td>SaaS</td>
          <td>Through API.</td>
        </tr>
        <tr>
          <td>On-premise (local agent)</td>
          <td>
            Software running locally — installation of a local agent is
            required.
          </td>
        </tr>
        <tr>
          <td>On-premise (API)</td>
          <td>Software running locally — API available.</td>
        </tr>
        <tr>
          <td rowSpan={2}>Status</td>
          <td>🔵 Live</td>
          <td>Connector is generally available and production-ready.</td>
        </tr>
        <tr>
          <td>🟣 Beta</td>
          <td>
            Connector is in beta — usable in production but may still evolve.
          </td>
        </tr>
        <tr>
          <td>Multi folder</td>
          <td>✅ Yes / ❌ No</td>
          <td>
            Connection to multiple accounting folders at the same time (see{' '}
            <a href="/unified-apis/accounting/guides-and-behaviours/folders">
              accounting folders guide
            </a>
            ).
          </td>
        </tr>
        <tr>
          <td>Rate limits</td>
          <td>✅ No / ❌ Yes</td>
          <td>Whether the target software sets rate limits on API calls.</td>
        </tr>
        <tr>
          <td rowSpan={3}>API keys</td>
          <td>❎ No</td>
          <td>
            No API keys required (OAuth2 client secret and client ID). No
            requirements to activate the connector — you can create a
            connection.
          </td>
        </tr>
        <tr>
          <td>🔑</td>
          <td>
            Keys are required to activate the connector. Chift cannot act as
            intermediary to obtain them; we can still assist with steps to get
            keys directly from the software provider.
          </td>
        </tr>
        <tr>
          <td>🔑 ☑️ via Chift</td>
          <td>
            Keys are required to activate the connector. You can go through
            Chift to get the keys (intermediary or partnership keys). An
            approval process may still apply, but you do not need to request
            keys from the vendor on your own.
          </td>
        </tr>
        <tr>
          <td rowSpan={3}>Approval / certification process</td>
          <td>⚡ Instant</td>
          <td>
            No keys required, or Chift can encode their keys for you when
            requested. Activation is instantaneous.
          </td>
        </tr>
        <tr>
          <td>🟢 Approval — [Duration]</td>
          <td>
            Approval will be granted. The vendor may require information or app
            configuration in a developer portal before issuing keys.
          </td>
        </tr>
        <tr>
          <td>🟠 Approval — [Duration]</td>
          <td>
            Approval is not guaranteed — often due to integration strategy; the
            vendor may do a deeper assessment (competitors, partnership
            requirements, and similar).
          </td>
        </tr>
        <tr>
          <td rowSpan={2}>Activation time</td>
          <td>⚡ Instant</td>
          <td>
            If no keys are required, or Chift has keys ready to share with you.
          </td>
        </tr>
        <tr>
          <td>Time</td>
          <td>
            Estimated time to get the connector activated in production as a
            result of the approval or certification process (e.g. ⏱️ 2 days, 1
            week).
          </td>
        </tr>
        <tr>
          <td rowSpan={3}>Extra fees — software editor</td>
          <td>❎ No</td>
          <td>No fees charged by the software editor.</td>
        </tr>
        <tr>
          <td>💰 🕹️</td>
          <td>Fees associated with obtaining a testing account.</td>
        </tr>
        <tr>
          <td>💰 🔑</td>
          <td>Fees charged to get API keys.</td>
        </tr>
        <tr>
          <td rowSpan={2}>Extra fees — end user</td>
          <td>❎ No</td>
          <td>The end user does not pay extra to get integrated.</td>
        </tr>
        <tr>
          <td>💰 Yes</td>
          <td>The end user must pay extra to get integrated.</td>
        </tr>
        <tr>
          <td>Comments on costs</td>
          <td>—</td>
          <td>Additional notes on fees or pricing when relevant.</td>
        </tr>
        <tr>
          <td rowSpan={4}>Sandbox account</td>
          <td>✅ via Chift</td>
          <td>Chift can provide you with a sandbox.</td>
        </tr>
        <tr>
          <td>🟠 Only through integrator</td>
          <td>Only the software's integrator can provide a sandbox.</td>
        </tr>
        <tr>
          <td>✅ Self-service</td>
          <td>You can create your own sandbox.</td>
        </tr>
        <tr>
          <td>✅ Trial account</td>
          <td>It is possible to create a trial account.</td>
        </tr>
      </tbody>
    </table>
  </blockquote>;

export const ConnectorCardIframe = ({api = 'accounting', connectors}) => {
  const [theme, setTheme] = React.useState('light');
  React.useEffect(() => {
    const checkTheme = () => {
      const isDark = document.documentElement.classList.contains('dark');
      setTheme(isDark ? 'dark' : 'light');
    };
    checkTheme();
    const observer = new MutationObserver(checkTheme);
    observer.observe(document.documentElement, {
      attributes: true,
      attributeFilter: ['class']
    });
    return () => observer.disconnect();
  }, []);
  const queryParams = new URLSearchParams({
    api,
    theme,
    ...connectors ? {
      connectors
    } : {}
  });
  const iframeUrl = `https://chift-coverage-matrix.s3.eu-west-3.amazonaws.com/connector-card.html?${queryParams.toString()}`;
  return <iframe src={iframeUrl} title={`Chift connector information - ${api}`} style={{
    display: 'block',
    width: '100%',
    height: '480px',
    margin: 0,
    padding: 0,
    border: 'none'
  }} />;
};

export const CoverageIframe = ({api = 'accounting', connectors}) => {
  const [theme, setTheme] = React.useState('light');
  const [isFullscreen, setIsFullscreen] = React.useState(false);
  const [currentIframeUrl, setCurrentIframeUrl] = React.useState(null);
  const iframeRef = React.useRef(null);
  React.useEffect(() => {
    const checkTheme = () => {
      const isDark = document.documentElement.classList.contains('dark');
      setTheme(isDark ? 'dark' : 'light');
    };
    checkTheme();
    const observer = new MutationObserver(checkTheme);
    observer.observe(document.documentElement, {
      attributes: true,
      attributeFilter: ['class']
    });
    return () => observer.disconnect();
  }, []);
  React.useEffect(() => {
    const handleFullscreenChange = () => {
      setIsFullscreen(!!document.fullscreenElement);
    };
    document.addEventListener('fullscreenchange', handleFullscreenChange);
    return () => document.removeEventListener('fullscreenchange', handleFullscreenChange);
  }, []);
  React.useEffect(() => {
    const handleMessage = event => {
      if (!event.origin.includes('chift-coverage-matrix.s3.eu-west-3.amazonaws.com')) return;
      if (event.data?.type === 'urlChange' && event.data?.url) {
        setCurrentIframeUrl(event.data.url);
      }
    };
    window.addEventListener('message', handleMessage);
    return () => window.removeEventListener('message', handleMessage);
  }, []);
  const queryParams = new URLSearchParams({
    api,
    theme,
    ...connectors ? {
      connectors
    } : {}
  });
  const iframeUrl = `https://chift-coverage-matrix.s3.eu-west-3.amazonaws.com/coverage.html?${queryParams.toString()}`;
  const openUrl = currentIframeUrl || iframeUrl;
  const toggleFullscreen = () => {
    if (!document.fullscreenElement) {
      iframeRef.current?.requestFullscreen();
    } else {
      document.exitFullscreen();
    }
  };
  const isDark = theme === 'dark';
  const buttonStyle = {
    display: 'inline-flex',
    alignItems: 'center',
    gap: '8px',
    padding: '4px 12px',
    fontSize: '14px',
    fontWeight: '500',
    color: isDark ? '#d4d4d4' : '#374151',
    backgroundColor: 'transparent',
    border: `1px solid ${isDark ? '#404040' : '#e5e7eb'}`,
    borderRadius: '12px',
    cursor: 'pointer',
    textDecoration: 'none',
    transition: 'all 0.15s ease'
  };
  const hoverBg = isDark ? 'rgba(255,255,255,0.05)' : 'rgba(0,0,0,0.03)';
  const hoverBorder = isDark ? '#525252' : '#d1d5db';
  const defaultBg = 'transparent';
  const defaultBorder = isDark ? '#404040' : '#e5e7eb';
  return <>
  <div style={{
    display: 'flex',
    justifyContent: 'flex-end',
    gap: '12px',
    marginBottom: '8px'
  }}>
    <button onClick={toggleFullscreen} style={buttonStyle} onMouseEnter={e => {
    e.target.style.backgroundColor = hoverBg;
    e.target.style.borderColor = hoverBorder;
  }} onMouseLeave={e => {
    e.target.style.backgroundColor = defaultBg;
    e.target.style.borderColor = defaultBorder;
  }}>
      <svg width="16" height="16" viewBox="0 0 24 24" fill="none" stroke="currentColor" strokeWidth="2" strokeLinecap="round" strokeLinejoin="round">
        {isFullscreen ? <>
            <polyline points="4 14 10 14 10 20"></polyline>
            <polyline points="20 10 14 10 14 4"></polyline>
            <line x1="14" y1="10" x2="21" y2="3"></line>
            <line x1="3" y1="21" x2="10" y2="14"></line>
          </> : <>
            <polyline points="15 3 21 3 21 9"></polyline>
            <polyline points="9 21 3 21 3 15"></polyline>
            <line x1="21" y1="3" x2="14" y2="10"></line>
            <line x1="3" y1="21" x2="10" y2="14"></line>
          </>}
      </svg>
      {isFullscreen ? 'Exit Fullscreen' : 'Fullscreen'}
    </button>
    <a href={iframeUrl} target="_blank" rel="noopener noreferrer" style={buttonStyle} onMouseEnter={e => {
    e.target.style.backgroundColor = hoverBg;
    e.target.style.borderColor = hoverBorder;
  }} onMouseLeave={e => {
    e.target.style.backgroundColor = defaultBg;
    e.target.style.borderColor = defaultBorder;
  }}>
      <svg width="16" height="16" viewBox="0 0 24 24" fill="none" stroke="currentColor" strokeWidth="2" strokeLinecap="round" strokeLinejoin="round">
        <path d="M18 13v6a2 2 0 0 1-2 2H5a2 2 0 0 1-2-2V8a2 2 0 0 1 2-2h6"></path>
        <polyline points="15 3 21 3 21 9"></polyline>
        <line x1="10" y1="14" x2="21" y2="3"></line>
      </svg>
      Open in new tab
    </a>
  </div>
  <iframe ref={iframeRef} src={iframeUrl} title={`Chift Coverage Matrix - ${api}`} style={{
    height: 'max(500px, 80vh)'
  }} className="w-full" allowFullScreen />
  <blockquote>
    <p>
      <strong>Matrix Legend 🧭</strong>
    </p>
    <table>
      <thead>
        <tr>
          <th>Status</th>
          <th>Meaning</th>
        </tr>
      </thead>
      <tbody>
        <tr>
          <td>✅ Implemented</td>
          <td>Endpoint is implemented and available.</td>
        </tr>
        <tr>
          <td>❌ Not supported</td>
          <td>
            Endpoint is not supported by the target software (connector
            limitation). Cannot be implemented.
          </td>
        </tr>
        <tr>
          <td>💬 On request</td>
          <td>
            Endpoint is not implemented but feasibility is validated. Can be
            implemented on request — contact your Chift point of contact to
            discuss scope and timing.
          </td>
        </tr>
        <tr>
          <td>🔎 To be analyzed</td>
          <td>
            Endpoint is not implemented and feasibility has not yet been fully
            assessed. Analysis is pending.
          </td>
        </tr>
      </tbody>
    </table>
  </blockquote>
</>;
};

<ConnectorCardIframe api="accounting" connectors="NetSuite" />

<Accordion title="Overview Legend 🧭">
  <OverviewLegend showTitle={false} />
</Accordion>

## Introduction

NetSuite is the leading integrated cloud business software suite, including business accounting, ERP, CRM and ecommerce software. An AI-powered business management suite, encompassing ERP/Financials, CRM, and ecommerce for more than 41,000 customers.

## Configure NetSuite

### Prerequisites

To activate the connector on your Chift App, you need OAuth credentials (**Client ID** and **Client Secret**) that Chift provides to you. **<u>→ Reach out to your Chift point of contact to request them.</u>**

Note: Your end users connect their NetSuite account by installing the **Chift Integration Bundle** (see the [Chift Integration Bundle](#chift-integration-bundle) section), so they have no API keys, Client ID, or Secret to obtain on their side.

### Activation process

Activating NetSuite requires OAuth credentials that Chift provides to you. Reach out to your Chift point of contact to request them, then enter the **Client ID** and **Client Secret** at the connector level in your Chift account to activate the connector.

**OAuth credentials.** Chift provides shared OAuth credentials embedded in the Chift Integration Bundle. You enter them once, at the connector level in your Chift account, and they work across all your end users' NetSuite instances, so there is nothing to configure per instance or per client.

Your end users never handle these credentials: to connect, they install the bundle, authorize, and provide only their NetSuite Account ID.

**Using your own credentials.** If you'd rather use your own OAuth credentials (e.g. under your own brand), Chift can create a dedicated bundle for you; you then enter your own Client ID / Secret at the connector level. Contact your Chift point of contact to set this up.

### Set up

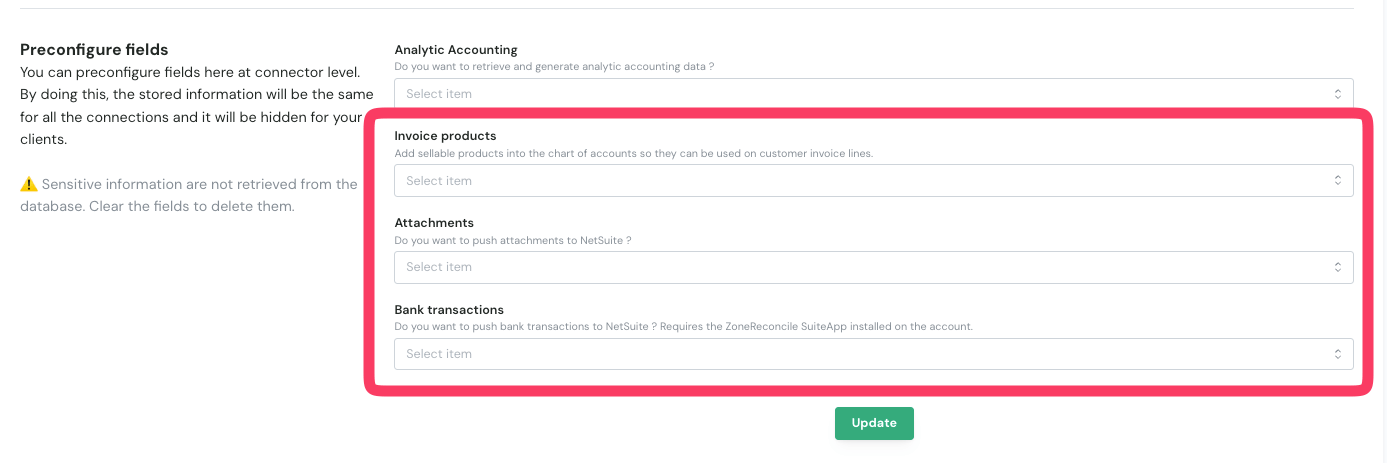
A few NetSuite behaviours are controlled by **connector-level preconfigure fields** in your Chift account (**Connectors → NetSuite → Preconfigure fields**). A value set here applies to **all** your NetSuite connections and is **hidden from your end users** — configure them once, based on the capabilities you need. Each field defaults to **inactive**.<br />

<Frame>
  <img src="https://mintcdn.com/chift/Qjgvi_6S2XqTqsA9/images/image-4.png?fit=max&auto=format&n=Qjgvi_6S2XqTqsA9&q=85&s=e744aae1538c48a82d7dc95cd6878668" alt="Image" width="1387" height="463" data-path="images/image-4.png" />
</Frame>

| Field                 | What it does                                                                                         | Set to *active* when…                                                                                                                                                               |
| --------------------- | ---------------------------------------------------------------------------------------------------- | ----------------------------------------------------------------------------------------------------------------------------------------------------------------------------------- |
| **Invoice products**  | Adds sellable products into the chart of accounts so they can be used on **customer invoice lines**. | You create **customer (sales) invoices**. If left inactive, customer invoices are not supported for the connection — only supplier invoices.                                        |
| **Attachments**       | Enables pushing attachments to NetSuite.                                                             | You push attachments. Requires the Chift Integration Bundle (the RESTlet it installs); Chift verifies it is present when a connection is created.                                   |
| **Bank transactions** | Enables pushing bank transactions to NetSuite.                                                       | You push bank transactions. Requires the **ZoneReconcile (Zone & Co)** SuiteApp on the account (see [Limitations](#limitations)); Chift checks for it when a connection is created. |

<Note>
  Leave a capability inactive if you don't use it. Enabling **Attachments** or **Bank transactions** makes Chift check, at connection time, that the required bundle RESTlet / ZoneReconcile SuiteApp is installed — so only enable them once those prerequisites are in place.
</Note>

## Test NetSuite

A sandbox environment is available from NetSuite, but only for customers with an active NetSuite subscription. It is typically priced at **\~10–20% of the annual subscription cost**.

In practice, the recommended approach is to partner with **beta clients or partners who already have NetSuite access** and can provide a test environment for integration testing.

## Connect NetSuite

Your end users connect their NetSuite account by installing the **Chift Integration Bundle** in NetSuite, assigning the bundled role, and authorizing in Chift. For the detailed step-by-step guide, check out the documentation:

* [Connect NetSuite – English](/help/connectors/accounting/netsuite)
* [Connecter NetSuite – Français](/help/connectors/accounting/netsuite)

See the following paragraph about the Chift Integration Bundle that end users install.

## Chift Integration Bundle

Chift connects to NetSuite through a **SuiteBundle** that your end users install in their NetSuite account in one click. The bundle delivers everything the connector needs — no file uploads, no manual script configuration, and no copying of a Client ID or Secret. It **does not modify the native behavior of NetSuite**; it packages the objects Chift needs to read and write data.

### What the bundle delivers

* A **RESTlet** script and deployment — powers attachments and bank transactions, which NetSuite's native REST API cannot handle.
* Two ready-to-assign **custom roles** — **`Chift Integration`** (full read + write) and **`Chift Integration (Read Only)`** (read-only). See the Roles & permissions section below.
* The **OAuth 2.0 integration record** — installs already **enabled**, with Chift's OAuth app embedded. Your end users never see or enter a Client ID or Secret.
* A **`Chift Attachments`** File Cabinet folder — the default target for stored attachments (overridable in Chift's post-connection settings).

### End-user onboarding

Installing and connecting the bundle is a four-step process for the NetSuite administrator: **enable SuiteCloud features → install the bundle → assign a role to the connecting user → authorize in Chift** (only the NetSuite account ID is required). The full step-by-step guide lives in the [Help Center article](/help/connectors/accounting/netsuite).

<Note>
  The connection runs with the role the end user authorizes with. End users can connect with one of the bundled roles or their own scoped role — see the Roles & permissions section below. After assigning or changing a role, the end user must **log out and back in** for it to appear at the consent screen.
</Note>

### Compatibility & requirements

* **Attachments** and all standard accounting endpoints work over the single OAuth 2.0 token — there is no separate token-based-authentication step.
* **Bank transactions** require the third-party **ZoneReconcile (Zone & Co)** SuiteApp to be installed (see Limitations).
* **OneWorld (multi-subsidiary) accounts**: the role ships with Subsidiary Restrictions set to **All** so the connector can see every subsidiary. Restricting it to *User Subsidiary* (or disabling *Include Sub-Subsidiaries*) hides child subsidiaries from Chift.
* **Custom segments used as analytic dimensions**: enable the SuiteCloud **Custom Segments** feature and grant the matching permission on the role, otherwise analytic dimensions silently return empty.

### Roles & permissions

The connection runs with **whatever role the end user authorizes with**, so that role determines how much access Chift has. NetSuite enforces the access itself — the bundle's RESTlet accepts any role — so end users can pick the option that fits their security requirements:

* **`Chift Integration` (read + write)** — the bundled role for full read/write access. Use it when Chift needs to create data (invoices, journal entries, bank transactions, attachments, …).
* **`Chift Integration (Read Only)`** — the bundled role for read-only access. Use it when Chift only reads data.
* **Your own role** — end users can connect with an existing or custom NetSuite role scoped to their needs, granting only the permissions the Chift features they use actually require. A per-feature endpoint→permission mapping table will document exactly what to enable *(coming soon)*.

<Warning>
  Avoid connecting as **Administrator** — the connection would then run with full administrator access instead of a scoped role. Choose the bundled role (or a scoped custom role) that matches the access you actually need.
</Warning>

## Limitations

### `POST invoices/payments` **([Create an invoice payment](https://docs.chift.eu/api-reference/endpoints/accounting/create-an-invoice-payment)):** Payment method must be linked to a ledger account

A payment method must be linked to a ledger account in NetSuite to be used in an invoice payment. This configuration is done at the payment method level in NetSuite — you will have to make sure each payment method you intend to use for invoice payments has a ledger account assigned. An error will be thrown if this is not the case.

### Bank transactions require the ZoneReconcile SuiteApp

Bank-statement and transaction records are **not** part of the Chift bundle — they are owned by the third-party **ZoneReconcile (Zone & Co)** reconciliation SuiteApp. Creating bank transactions therefore requires ZoneReconcile to be installed on the NetSuite account, with the `Chift Integration` role granted **Full** access to its bank record types (`customrecord_bank_statement`, `customrecord_ba_transactions`) and **Lists → Perform Search**. Attachments and all standard accounting endpoints do not depend on this.

## Coverage

<CoverageIframe api="accounting" connectors="NetSuite" />

## Troubleshooting

### Specific errors for NetSuite:

| Error Code                                     | Error description                                                                                | Resolution                                                                                                           |
| ---------------------------------------------- | ------------------------------------------------------------------------------------------------ | -------------------------------------------------------------------------------------------------------------------- |
| ERROR\_ACCOUNT\_TYPE\_NOT\_ALLOWED             | Only general accounts can be used when creating journal entries in NetSuite.                     | Use general accounts for journal entries.                                                                            |
| ERROR\_CUSTOMER\_INVOICE\_TYPE\_NOT\_SUPPORTED | Customer invoices are not supported in this NetSuite connection.                                 | Use supplier invoice types instead.                                                                                  |
| ERROR\_INVALID\_TRANSACTION\_DATE              | Transaction dates may be at most 30 years in the past and 10 years in the future.                | Use a transaction date within the allowed range.                                                                     |
| ERROR\_JOURNAL\_ID\_NOT\_AUTHORIZED            | Only journal\_id 3 and 4 are authorized for this connection to create sales or purchase entries. | Use the correct journal\_id for sales/purchase entries, or use the create journal entry endpoint for other journals. |
